v2025-10-23 or later
This manual is intended for validating applications on an FPGA platform.
This process requires an FPGA board compatible with RVX (Supported Boards).
This process also requires a license for AMD Vivado, which must be obtained separately.
Prerequisite: Synthesizing a Platform
Command:
cmd) cd #(platform dir)
cmd) make #(FPGA name) // i.e., make arty-100t
Result:
#(platform dir)/imp_#(fpga
name)_#(date) is created,
which we refer to as #(fpga
dir).
Note: #(fpga dir) is automatically managed by the RVX tool.
Command:
cmd) cd #(fpga dir)
cmd) make projectIncluded Process: Creating a Vivado Project
Command:
cmd) cd #(fpga dir)
cmd) make imp
Result:
A bitstream and reports are generated in the #(fpga dir)/imp_result
directory.
cmd) cd #(fpga dir)
cmd) make cleanFor the following functionalities, you must power on the FPGA board and connect it to your computer.
Prerequisite:
Generating an FPGA Bitstream
An FPGA board connected to your computer - Manual
Command:
cmd) cd #(fpga dir)
cmd) make programPrerequisite: Programming the FPGA with the Generated Bitstream
cmd) cd #(fpga dir)
cmd) make printfcmd) cd #(fpga dir)
cmd) make printf
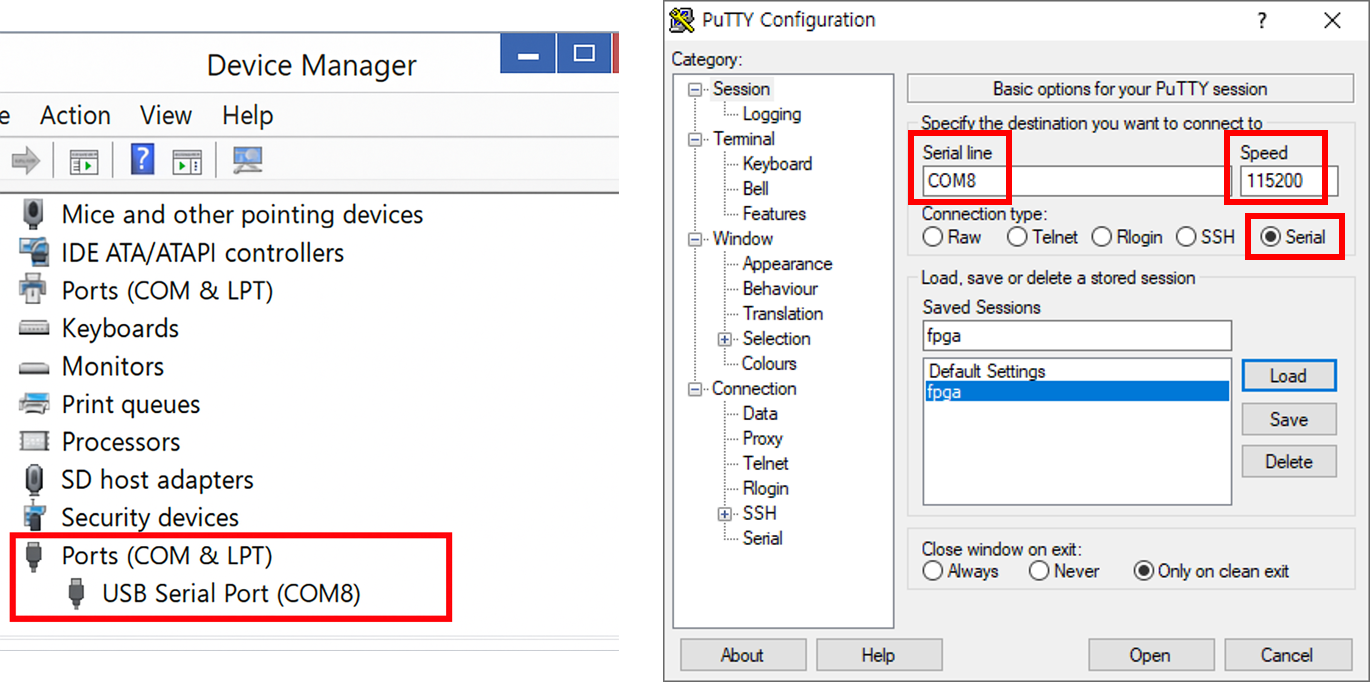
> Device Manager and PuTTY will be launched.
inst) Check the USB Serial Port number in Device Manager.
> In Figure 1, the port number is COM8.
inst) On PuTTY, configure the settings as highlighted by the three red boxes in Figure 1.
> If you save the session, you can reuse these settings later.
inst) OpenPrerequisite:
Developing an Application
Programming the FPGA with the Generated Bitstream
Opening the Terminal to View printf Output
Note:
Build compiles only the parts that have changed.
Make sure all the sliding switches of the FPGA board are set to the down position.
Included Process:
Building an Application with BUILD_MODE=debug
cmd) cd #(fpga dir)
cmd) make #(app name).runIncluded Process:
Cleaning Build Results
Building an Application with BUILD_MODE=debug
cmd) cd #(fpga dir)
cmd) make #(app name).rerunIncluded Process:
Building an Application with BUILD_MODE=release
cmd) cd #(fpga dir)
cmd) make #(app name).optIncluded Process:
Cleaning Build Results
Building an Application with BUILD_MODE=release
cmd) cd #(fpga dir)
cmd) make #(app name).reoptIncluded Process:
Cleaning Build Results
Building an Application with BUILD_MODE=profile
cmd) cd #(fpga dir)
cmd) make #(app name).profilePrerequisite: Creating a Vivado Project
Command:
cmd) cd #(fpga dir)
cmd) make open_projectcmd) cd #(platform dir)
cmd) make fpga_listcmd) cd #(fpga dir)
cmd) make app_listcmd) cd #(platform dir)
cmd) make clean_imp
cmd) sudo minicom -s
inst) Select “Serial port setup”.
inst) Configure the settings as shown in Figure 2.